Migrate from Statsig to PostHog

Last updated:

|Edit this page

Statsig is a multi-product feature flag, experimentation, and analytics platform. This means going from Statsig to PostHog requires migrating data from each product.

This guide walks through getting data from Statsig, converting it to the PostHog format, and using it to create or capture data in PostHog.

Differences between Statsig and PostHog

PostHog and Statsig have many of the same features and concepts, but different names and slight variations:

  • Statsig has multiple types of feature and config management types including feature gates, experiments, dynamic configs, and parameter stores. In PostHog, the same functionality is all built on feature flags, including experiments. For example, a feature gate in Statsig is a boolean feature flag in PostHog and a parameter store is a flag with a JSON payload.

  • Dynamic configs are slightly different. They are a key that returns multiple different values depending on the targeting rules. To match this functionality in PostHog, you can use a multi-variant feature flag with JSON payloads and rely on “optional overrides” to target the specific variant.

  • Both primarily rely on a combination of rules and user IDs to target flags. Statsig also enables targeting by tags. You can recreate this functionality in PostHog by using person properties to set “tags” on users or groups.

Learn more about how they compare in our PostHog vs Statsig comparison.

Getting your Statsig and PostHog API key

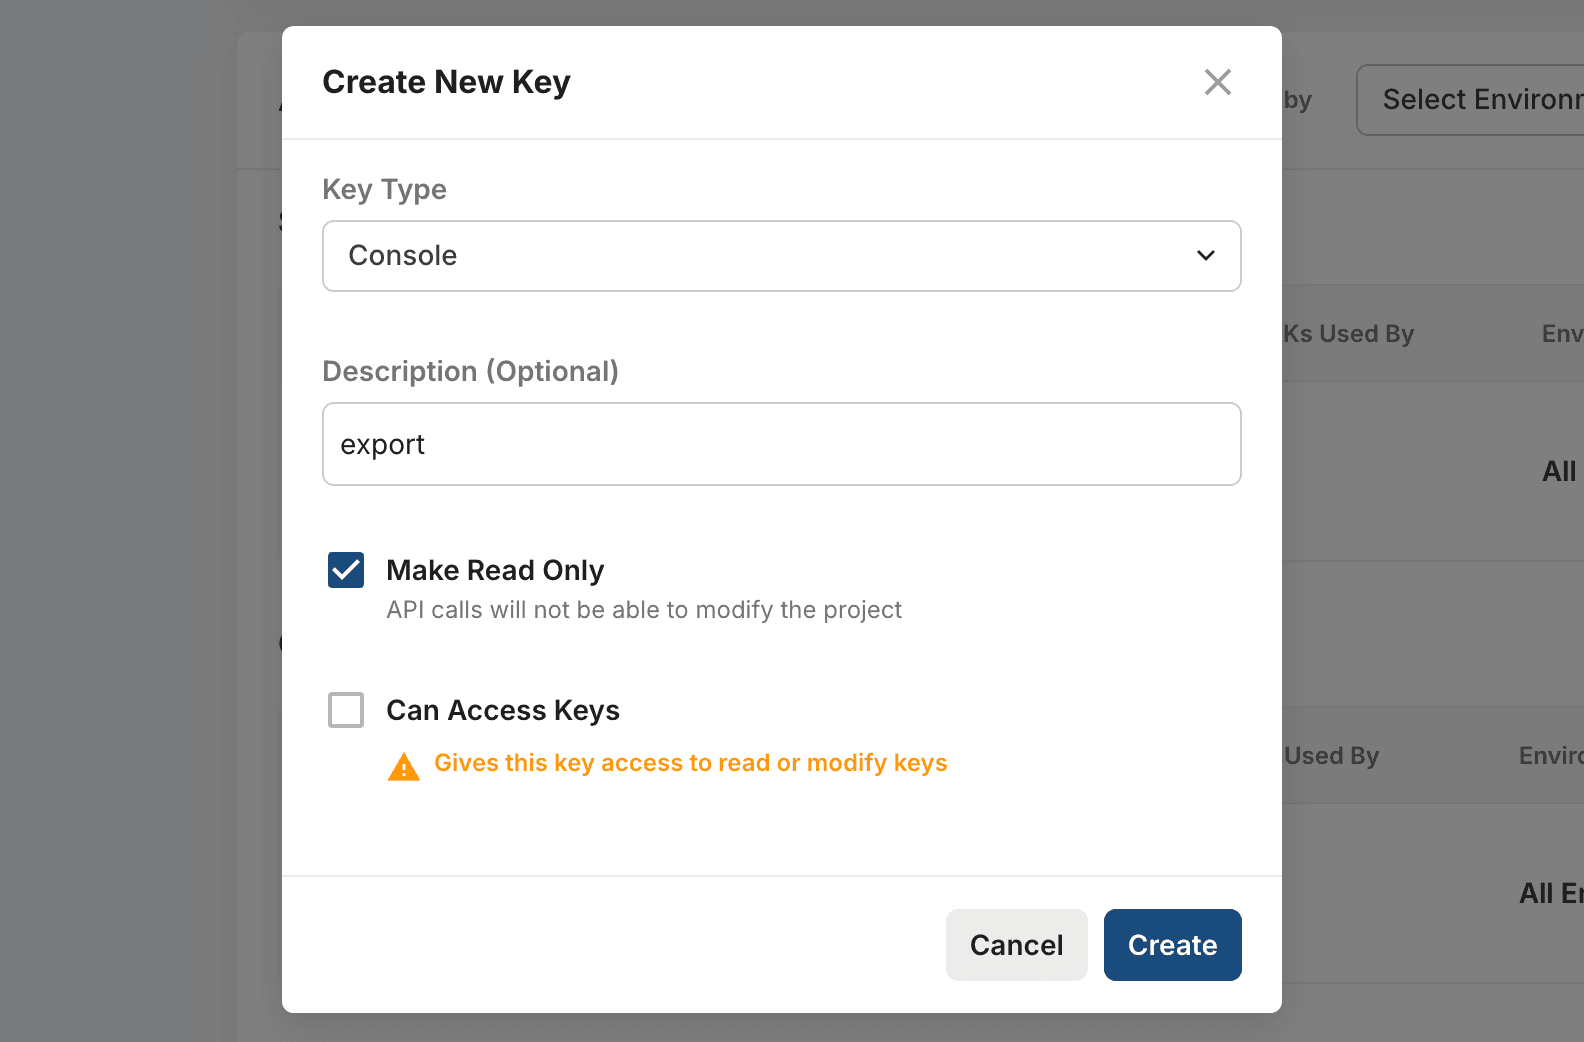
Accessing data via the Statsig API requires a console key. To create one, go to the Keys & Environments tab of your Statsig project settings. Click Generate New Key, select Console from the dropdown, make it read only, and click Create.

Statsig console key

From PostHog, you need:

  1. Project ID: A number, likely 5 digits, that you can find in the URL of your project or your project settings.

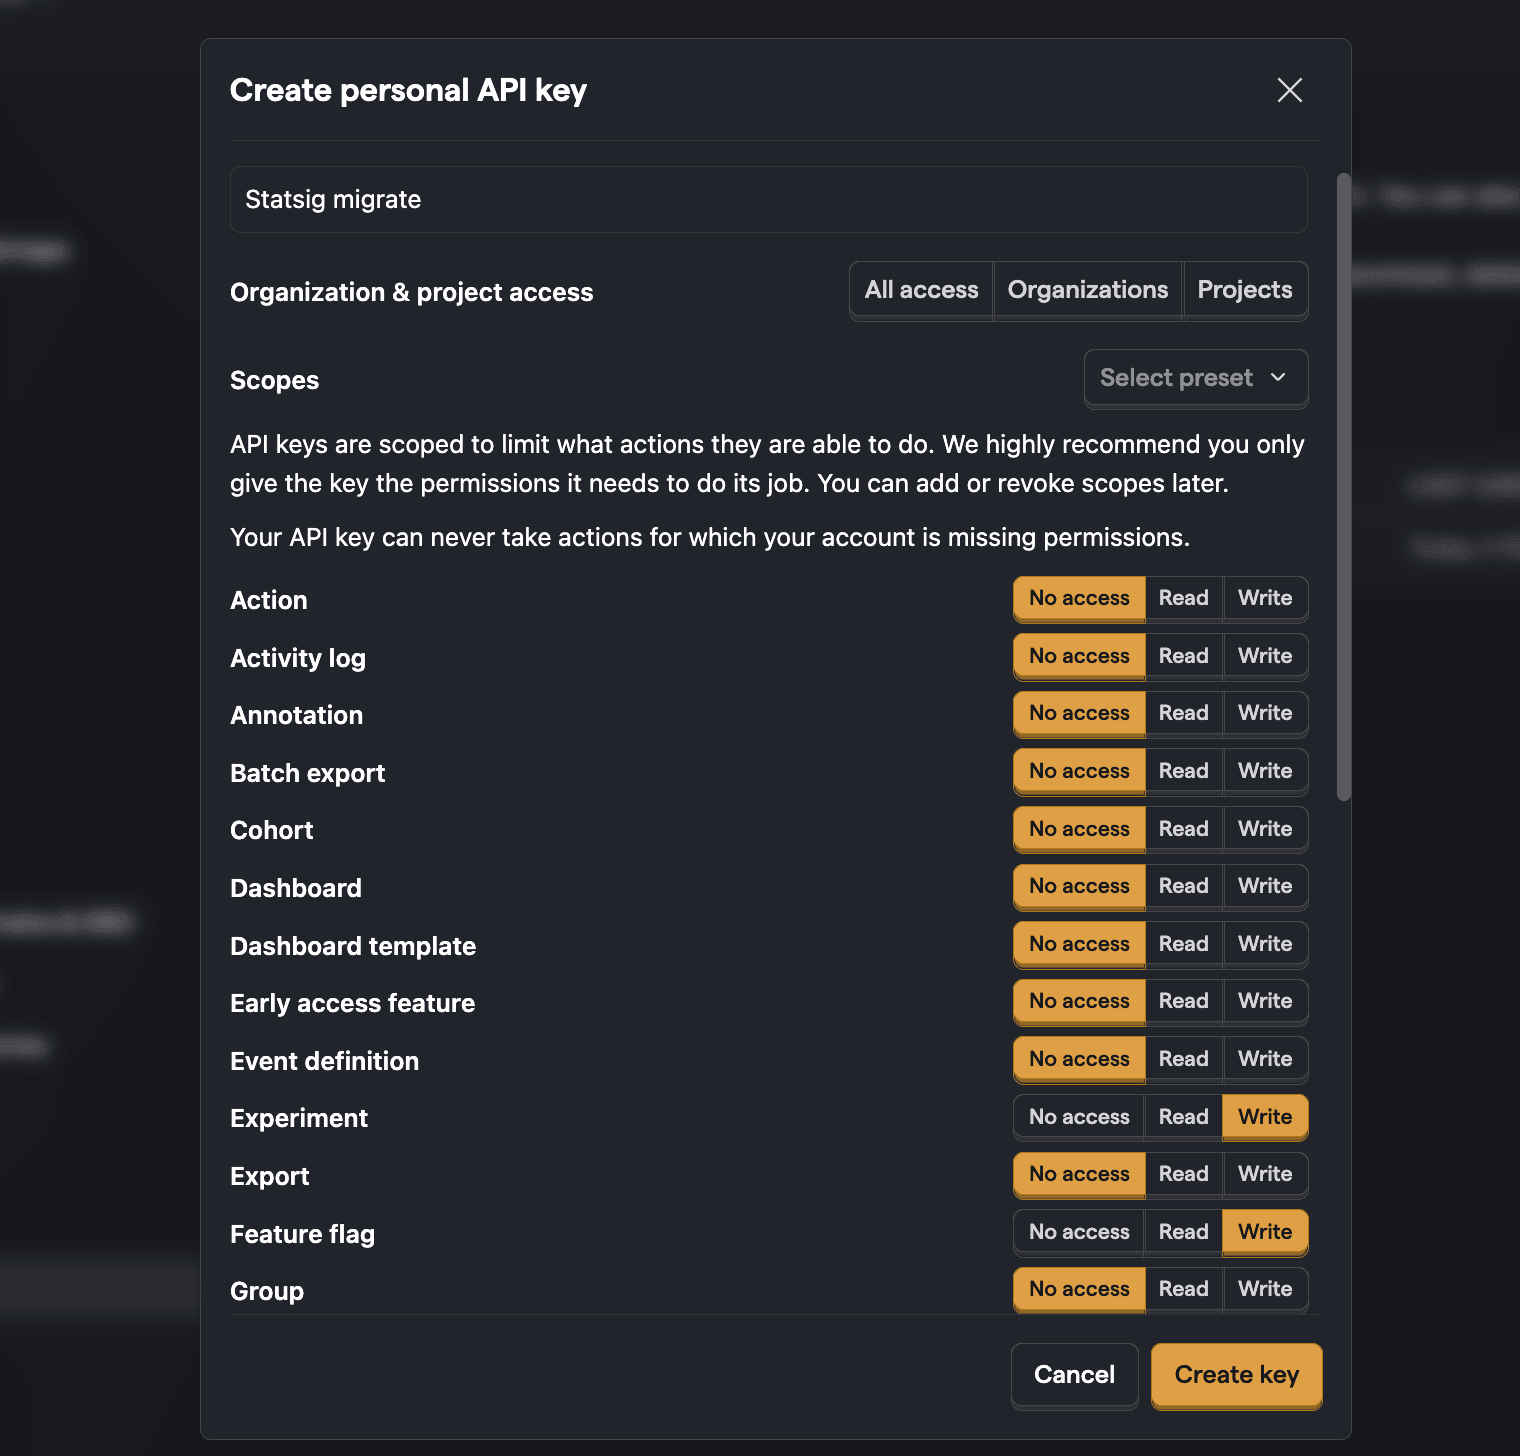
  2. Personal API key: To create one, go to the personal API key section of your project settings and click Create personal API key. Give it a label, write access to both experiments and feature flags, and then click Create key. Make sure to save it somewhere secure because you cannot access it later.

PostHog personal API key

Migrating feature gates from Statsig

Feature gates in Statsig turn into feature flags in PostHog. This conversion is straightforward, but because the targeting data structure is relatively complicated and customizable, you will need to redo it after creation.

Python
# Convert Statsig gates to PostHog flags
import requests
console_key = 'console-a1B2c3D4e5F6g7H8i9J0k2L3M4N5o6P7Q8R9S0TUvWxYz'
gates_url = 'https://statsigapi.net/console/v1/gates'
ph_api_key = 'phx_1a2b3c4d5e6f7g8h9i0j1k2l3m4n5o6p7q8r9s0tuvwxyz'
ph_project_id = '12345'
headers = {
'Accept': 'application/json',
'STATSIG-API-KEY': console_key
}
params = {
'idType': 'userID',
'limit': 10,
'page': 1
}
response = requests.get(gates_url, headers=headers, params=params)
if response.status_code == 200:
gates_data = response.json()
else:
print(f"Error: {response.status_code}")
print(response.text)
gates = gates_data["data"]
# Convert Statsig flags to PostHog format
for gate in gates:
ph_flag = {
"created_by": {
"first_name": gate['creatorName'].split()[0],
"last_name": gate['creatorName'].split()[-1] if len(gate['creatorName'].split()) > 1 else "",
"email": gate['creatorEmail']
},
"name": f"{gate['name']}\n\n{gate['description']}",
"key": gate['id'],
"active": gate['isEnabled'],
"filters": {
"groups": [
{
"properties": [],
"rollout_percentage": 100
}
]
}
}
# Create flag in PostHog
response = requests.post(
"<ph_app_host>/api/projects/{ph_project_id}/feature_flags/".format(
ph_project_id=ph_project_id
),
headers={"Authorization": "Bearer {}".format(ph_api_key)},
json=ph_flag
).json()

Once migrated, you can go into each flag to set the targeting rules and enable or rollout the flag. You can also replace your statsig.checkGate calls with posthog.isFeatureEnabled ones.

Migrating dynamic configs from Statsig

The structure of feature flags in PostHog doesn't map perfectly to Statsig's dynamic config functionality. To migrate them, we set them up as feature flags with JSON payloads, but you need to set up the rules and optional overrides to match the targeting of your dynamic config. We keep the default value at 100% to match the Statsig behavior.

Python
# Convert dynamic configs to flags
import json
import requests
console_key = 'console-a1B2c3D4e5F6g7H8i9J0k2L3M4N5o6P7Q8R9S0TUvWxYz'
configs_url = 'https://statsigapi.net/console/v1/dynamic_configs'
ph_api_key = 'phx_1a2b3c4d5e6f7g8h9i0j1k2l3m4n5o6p7q8r9s0tuvwxyz'
ph_project_id = '12345'
headers = {
'Accept': 'application/json',
'STATSIG-API-KEY': console_key
}
params = {
'limit': 10,
'page': 1
}
response = requests.get(configs_url, headers=headers, params=params)
if response.status_code == 200:
configs_data = response.json()
else:
print(f"Error: {response.status_code}")
print(response.text)
# Convert dynamic configs to PostHog flag format
configs = configs_data["data"]
for config in configs:
variants = []
payloads = {}
rules = config.get('rules', [])
if len(rules) == 0:
payloads["true"] = json.dumps(config['defaultValue'])
else:
default_variant = {
"key": "default",
"description": "Default from Statsig",
"rollout_percentage": 100
}
variants.append(default_variant)
payloads["default"] = json.dumps(config['defaultValue'])
rules = config.get('rules', [])
for rule in rules:
variant_key = rule['name'].lower().replace(' ', '_')
variant = {
"key": variant_key,
"description": rule['name'] + " from Statsig. Use an override to target this variant.",
"rollout_percentage": 0
}
variants.append(variant)
payloads[variant_key] = json.dumps(rule['returnValue'])
ph_flag = {
"created_by": {
"first_name": config['creatorName'].split()[0],
"last_name": config['creatorName'].split()[-1] if len(config['creatorName'].split()) > 1 else "",
"email": config['creatorEmail']
},
"name": f"{config['name']}\n\n{config['description']}",
"key": config['id'],
"active": config['isEnabled'],
"filters": {
"groups": [
{
"properties": [],
"rollout_percentage": 100
}
],
"multivariate": {"variants": variants} if len(variants) > 1 else None,
"payloads": payloads
}
}
# Create flag in PostHog
response = requests.post(
"<ph_app_host>/api/projects/{ph_project_id}/feature_flags/".format(
ph_project_id=ph_project_id
),
headers={"Authorization": "Bearer {}".format(ph_api_key)},
json=ph_flag
).json()

Once done, you can replace your statsig.getConfig call with a posthog.getFeatureFlagPayload one.

Note: As of writing this guide, Statsig does not have an endpoint for listing parameter stores, but you would follow a similar process to migrate them.

Migrating experiments from Statsig

Experiments between Statsig and PostHog are the most similar of the migrated data. Because they can be multi-variant and can have rules, we convert them in a similar way to dynamic configs. Some notes:

  • PostHog requires the control key to be control, so we need to convert whatever group is set as the control group in Statsig to the control key.

  • Because the structure of goal and secondary metrics are so different between the two, we don't include them in the experiments. You can change them after creation.

  • You can't add payloads (AKA parameters in Statsig) to the underlying feature flag via the experiments API. If you are relying on those, you must add them to the flag after creation.

Python
# Convert and create experiments
import json
import requests
console_key = 'console-a1B2c3D4e5F6g7H8i9J0k2L3M4N5o6P7Q8R9S0TUvWxYz'
experiments_url = 'https://statsigapi.net/console/v1/experiments'
ph_api_key = 'phx_1a2b3c4d5e6f7g8h9i0j1k2l3m4n5o6p7q8r9s0tuvwxyz'
ph_project_id = '12345'
headers = {
'Accept': 'application/json',
'STATSIG-API-KEY': console_key
}
params = {
'limit': 10,
'page': 1
}
response = requests.get(experiments_url, headers=headers, params=params)
if response.status_code == 200:
experiments_data = response.json()
else:
print(f"Error: {response.status_code}")
print(response.text)
experiments = experiments_data["data"]
for exp in experiments:
# Convert Statsig groups to PostHog variants
variants = []
payloads = {}
for group in exp['groups']:
variant = {
"key": "control" if group['id'] == exp['controlGroupID'] else group['name'],
"rollout_percentage": group['size']
}
variants.append(variant)
payloads[variant["key"]] = json.dumps(group['parameterValues'])
# Create PostHog experiment
ph_experiment = {
"name": exp['name'],
"description": "Hypothesis: " + exp['hypothesis'] + "\n\n" + exp['description'],
"feature_flag_key": exp['id'],
# Use pageview trend goal as default
"filters": {
"events": [
{
"id": "$pageview",
"math": "total",
"name": "$pageview",
"type": "events",
"order": 0
}
],
"display": "ActionsLineGraph",
"insight": "TRENDS",
"entity_type": "events",
# You can't add payloads to experiment flags via the API
},
"parameters": {
"feature_flag_variants": variants
},
}
# Create experiment in PostHog
response = requests.post(
"<ph_app_host>/api/projects/{project_id}/experiments/".format(
project_id=ph_project_id
),
headers={"Authorization": "Bearer {}".format(ph_api_key)},
json=ph_experiment
).json()

Once created, modify the goal and secondary metrics as well as the targeting to fit your needs and then launch your experiment.

Migrating events from Statsig

Prior to starting a historical data migration, ensure you do the following:

  1. Create a project on our US or EU Cloud.
  2. Sign up to a paid product analytics plan on the billing page (historic imports are free but this unlocks the necessary features).
  3. Set the historical_migration option to true when capturing events in the migration.

Note: As of writing this guide, the Statsig event API was not returning events. This is written using a mix of their sample data and data returned from requests in-app.

The schema of Statsig's event data is similar to PostHog's schema, but it requires converting to work with the rest of PostHog's data. You can see details on Statsig's schema in their docs and events and properties PostHog autocaptures in our docs.

With Statsig's event data, you can go through each row and convert it to PostHog's schema. This requires converting:

  • Event names like auto_capture::page_view to $pageview.
  • Properties like page_url to $current_url
  • Event timestamp to an ISO 8601 timestamp

Once this is done, you can capture the data into PostHog using the Python SDK or the capture API endpoint with historical_migration set to true. You can find your project API key and host in your project settings.

Here's an example Python script to convert Statsig's event data to PostHog's schema:

Python
# Capture event data from Statsig into PostHog
import json
import datetime
from posthog import Posthog
posthog = Posthog(
'<ph_project_api_key>',
host='https://us.i.posthog.com',
debug=True,
historical_migration=True
)
key_mapping = {
'os': '$os',
'os_version': '$os_version',
'browser_name': '$browser',
'browser_version': '$browser_version',
'language': '$browser_language',
'country': '$geoip_country_name',
'deviceType': '$device_type',
'device_id': '$device_id',
'page_url': '$current_url',
'sessionID': '$session_id'
}
event_mapping = {
'auto_capture::page_view_end': '$pageleave',
'auto_capture::page_view': '$pageview',
'auto_capture::error': '$error',
'auto_capture::click': '$autocapture',
}
omitted_keys = [
'name',
'timestamp',
'userID',
'id',
'event_name',
'sdk_key'
]
# This could be replaced with a request to the Statsig events API
with open('events.json', 'r') as file:
events_data = json.load(file)
events = events_data["data"]
for event in events:
distinct_id = event.get('userID') or event.get('deviceID') or event.get('user_id') or event.get('device_id')
ph_event_name = event.get('name') or event.get('event_name')
if ph_event_name == 'auto_capture::session_start':
continue
if ph_event_name in event_mapping:
ph_event_name = event_mapping[ph_event_name]
# Timestamp must be in ISO 8601 format
timestamp_ms = int(event.get('timestamp'))
ph_timestamp = datetime.datetime.fromtimestamp(timestamp_ms / 1000.0)
# Flatten metadata
if 'metadata' in event and isinstance(event['metadata'], dict):
for meta_key, meta_value in event['metadata'].items():
event[meta_key] = meta_value
del event['metadata']
# Flatten device_metadata
if 'device_metadata' in event and isinstance(event['device_metadata'], str):
device_metadata = json.loads(event['device_metadata'])
for meta_key, meta_value in device_metadata.items():
event[meta_key] = meta_value
del event['device_metadata']
# Flatten trimmed_data
if 'trimmed_data' in event and isinstance(event['trimmed_data'], str):
trimmed_data = json.loads(event['trimmed_data'])
for data_key, data_value in trimmed_data.items():
event[data_key] = data_value
del event['trimmed_data']
# Convert properties
properties = {}
for key, value in event.items():
if value == '' or value is None:
continue
elif key in omitted_keys:
continue
elif key in key_mapping:
properties[key_mapping[key]] = value
elif key == 'value':
if event.get('event_name') == 'auto_capture::page_view' or event.get('event_name') == 'auto_capture::page_view_end':
properties['$current_url'] = value
else:
properties[key] = value
else:
properties[key] = value
posthog.capture(
distinct_id=distinct_id,
event=ph_event_name,
properties=properties,
timestamp=ph_timestamp
)

This script may need modification depending on the structure of your Statsig data, but it gives you a start.

Questions?

Was this page useful?

Next article

Using PostHog with a CDP

What is a CDP? CDP stands for Customer Data Platform. It is a service that collects and unifies customer data from many sources and then sends it for use in other tools like product analytics (PostHog!), marketing automation, your CRM, data warehouses, and more. The most common CDPs are Segment and RudderStack , both of which work with PostHog. Do I need a CDP? If you don't have a CDP already set up, you might not need one. PostHog has: SDKs and API to capture data from anywhere. Data…

Read next article