How to vibe-code a game with DeskHog
Jun 22, 2025

DeskHog is an open-source developer toy, designed so that you can easily get started building your own apps and games from scratch. Just because it’s a developer toy doesn’t mean it’s just for experienced developers though — AI agents such as Cursor enable anyone to start building apps using just natural language.
This tutorial shows you how to get started building a simple game for DeskHog using Cursor, PlatformIO, GitHub, and some example prompts. We’ll start from the absolute basics and assume no prior knowledge or experience coding with C++, but quickly work towards making a basic Flappy Bird game for DeskHog.
Getting started with GitHub, Cursor, and PlatformIO
First, we need to collect the various tools we’ll use in this tutorial. The first thing you’ll need is a USB-C data cable that you can use to connect your DeskHog to a computer. Start by plugging it in and letting it charge — if you’ve not previously connected it to WiFi then now is a good time to scan the QR code with your phone and do that.
Next, we need to download a series of tools that we’ll use to make our game. Let’s start by downloading GitHub’s desktop client for free.
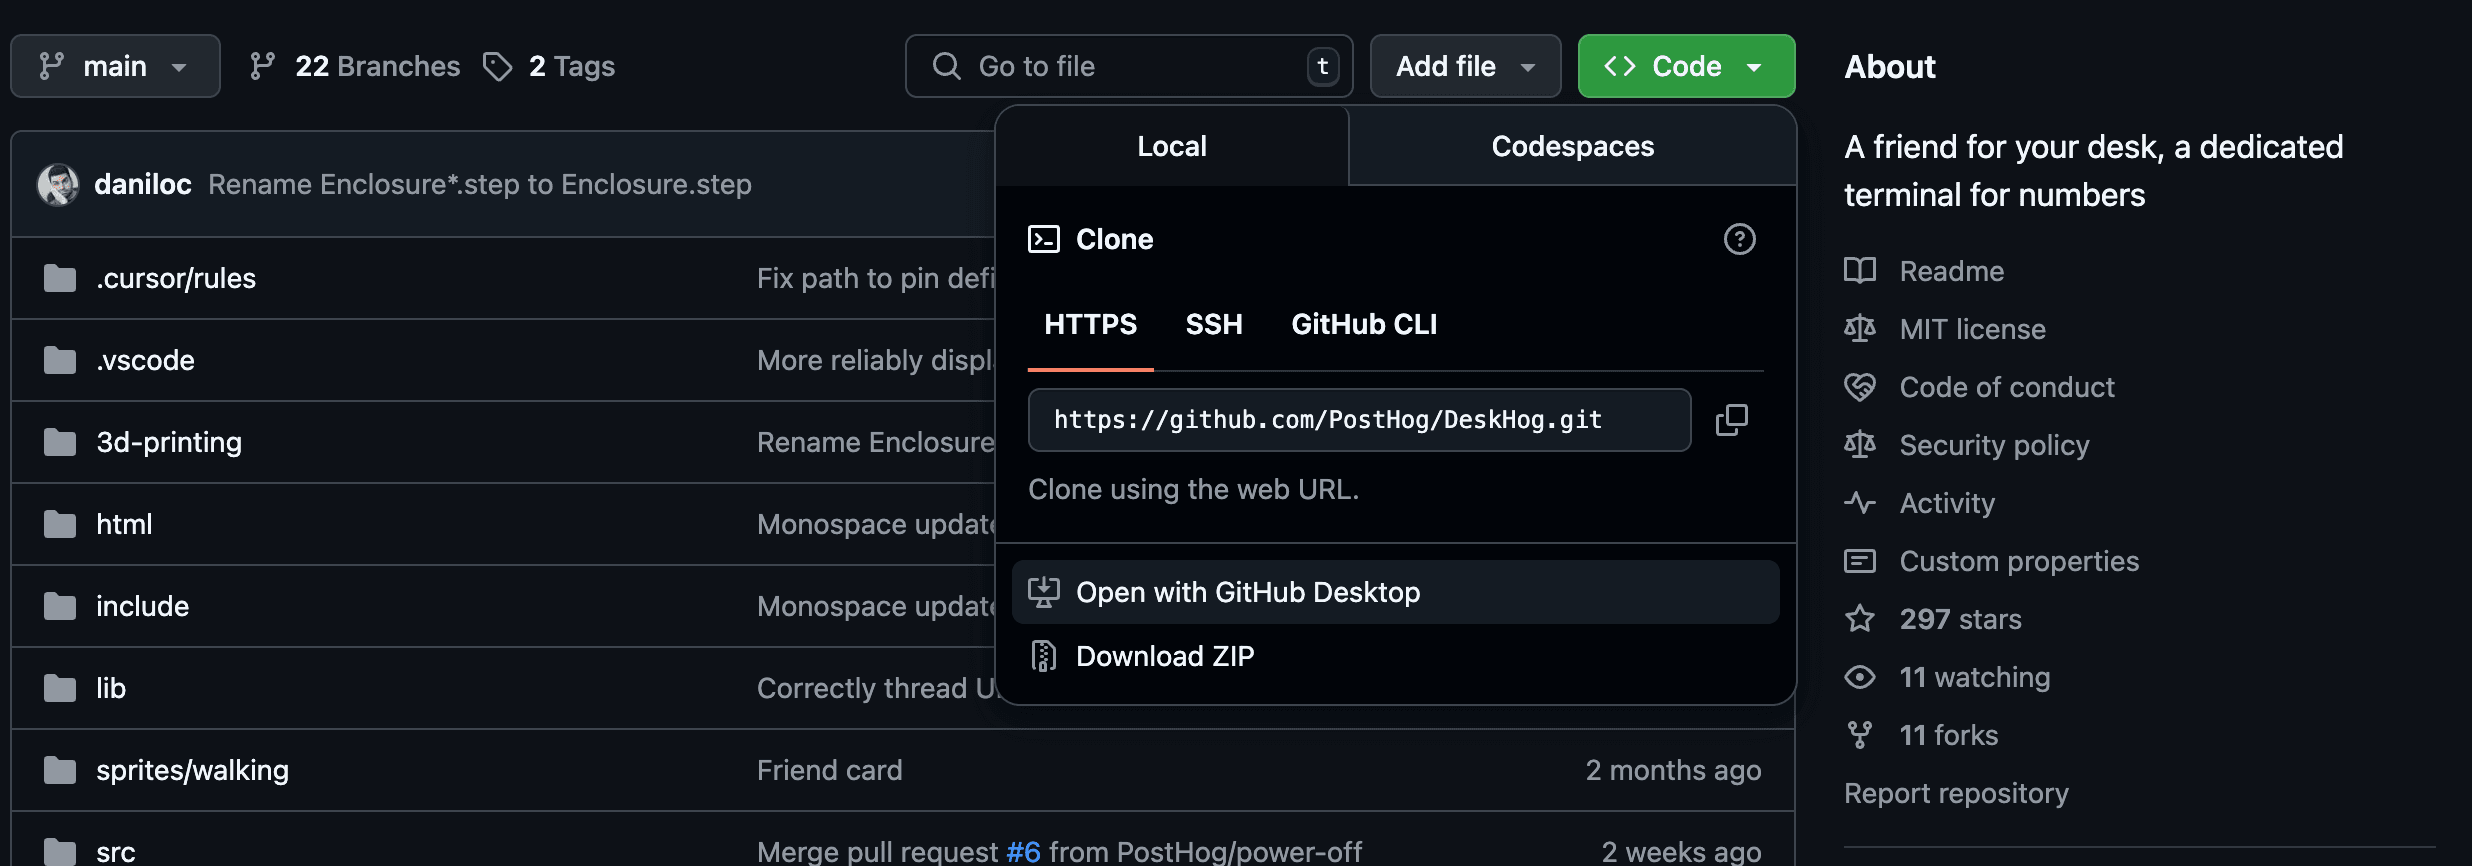
What is a GitHub repository? GitHub is a tool for managing code and working with it collaboratively. Code, like that which powers DeskHog, exists in repositories (repos). DeskHog’s repo is open-source, meaning it’s entirely public and free to edit. Cloning the repo to our computer enables us to work with the code and make branches of the codebase where we can make changes. We can then commit these changes back into the repository for everyone to see by creating a PR (pull request).
Once you’ve got it installed, you’ll need to connect it to the DeskHog repo. The quickest way to do this is to head to the repo in your browser and open it in GitHub Desktop.
Now that we’ve cloned the repo we can start making branches of the main codebase where we can add games, apps, and whatever else we want. Before we do that though, we need a way to edit the code — so it’s time to download Cursor.
What is vibe-coding? This tutorial focuses on vibe-coding, which is when you’re directly interacting with the code itself and may not even have a clear idea how it works. Instead, you’re trusting an AI agent (in this case the AI agent built into Cursor) to make the changes for you. Vibe-coding isn’t without it’s risks and caveats, but if you’ve got limited coding experience it can be an effective shortcut.
Once Cursor is installed, make sure it is set as your default code editor by opening GitHub Desktop and opening Settings > Integrations.
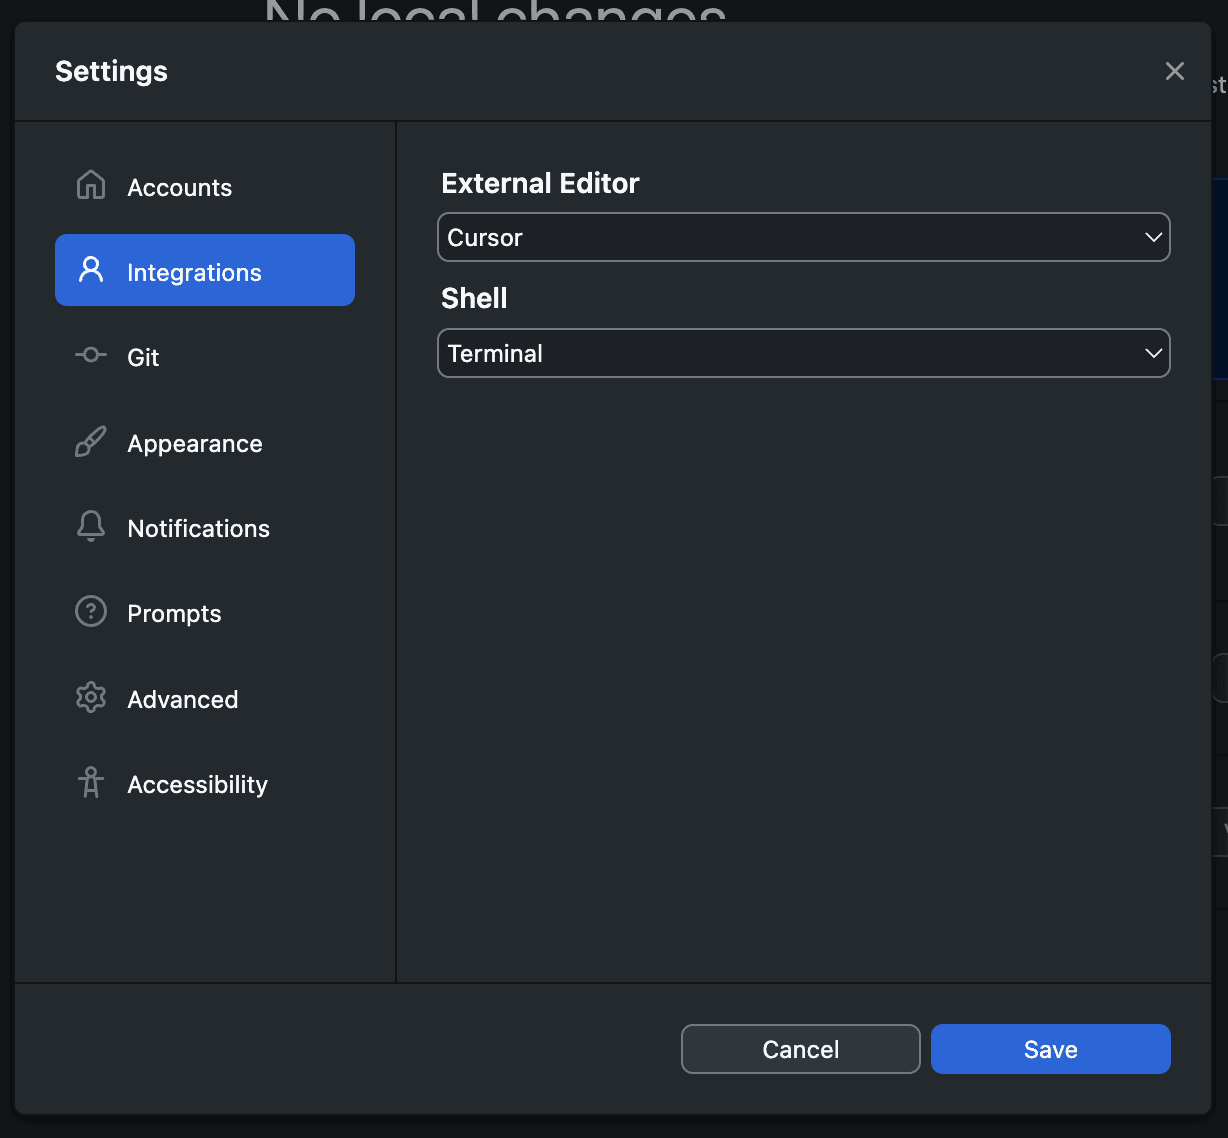
Now, whenever we want to code anything, GitHub will know Cursor is our tool of choice.
Finally, we need to add a Cursor extension called PlatformIO, which will enable us to build and deploy our code to our DeskHog.
What is building and deploying? When you create code, DeskHog won’t understand it on it’s own. Instead, you need to use Platform.io to build the code and then deploy it to the device. Building is essentially the process of translating your code into something the device can understand, while deploying is the process of moving it onto the device. It can help to think of it like you’re cooking a meal. First, you have to create a recipe (writing the code), then you follow the recipe (building the code), then you have to serve the meal (deploying the code). Cursor helps us with the first step, while PlatformIO handles the last two.
To install PlatformIO in Cursor, simply open Settings > Extensions and search for PlatformIO IDE, and install it.

Once installed, PlatformIO will add a bunch of new icons to the status bar at the bottom of your Cursor window. We’ll use those later to build and deploy the code, but first we need to create a branch and add some code to it.
Creating a branch and adding some code
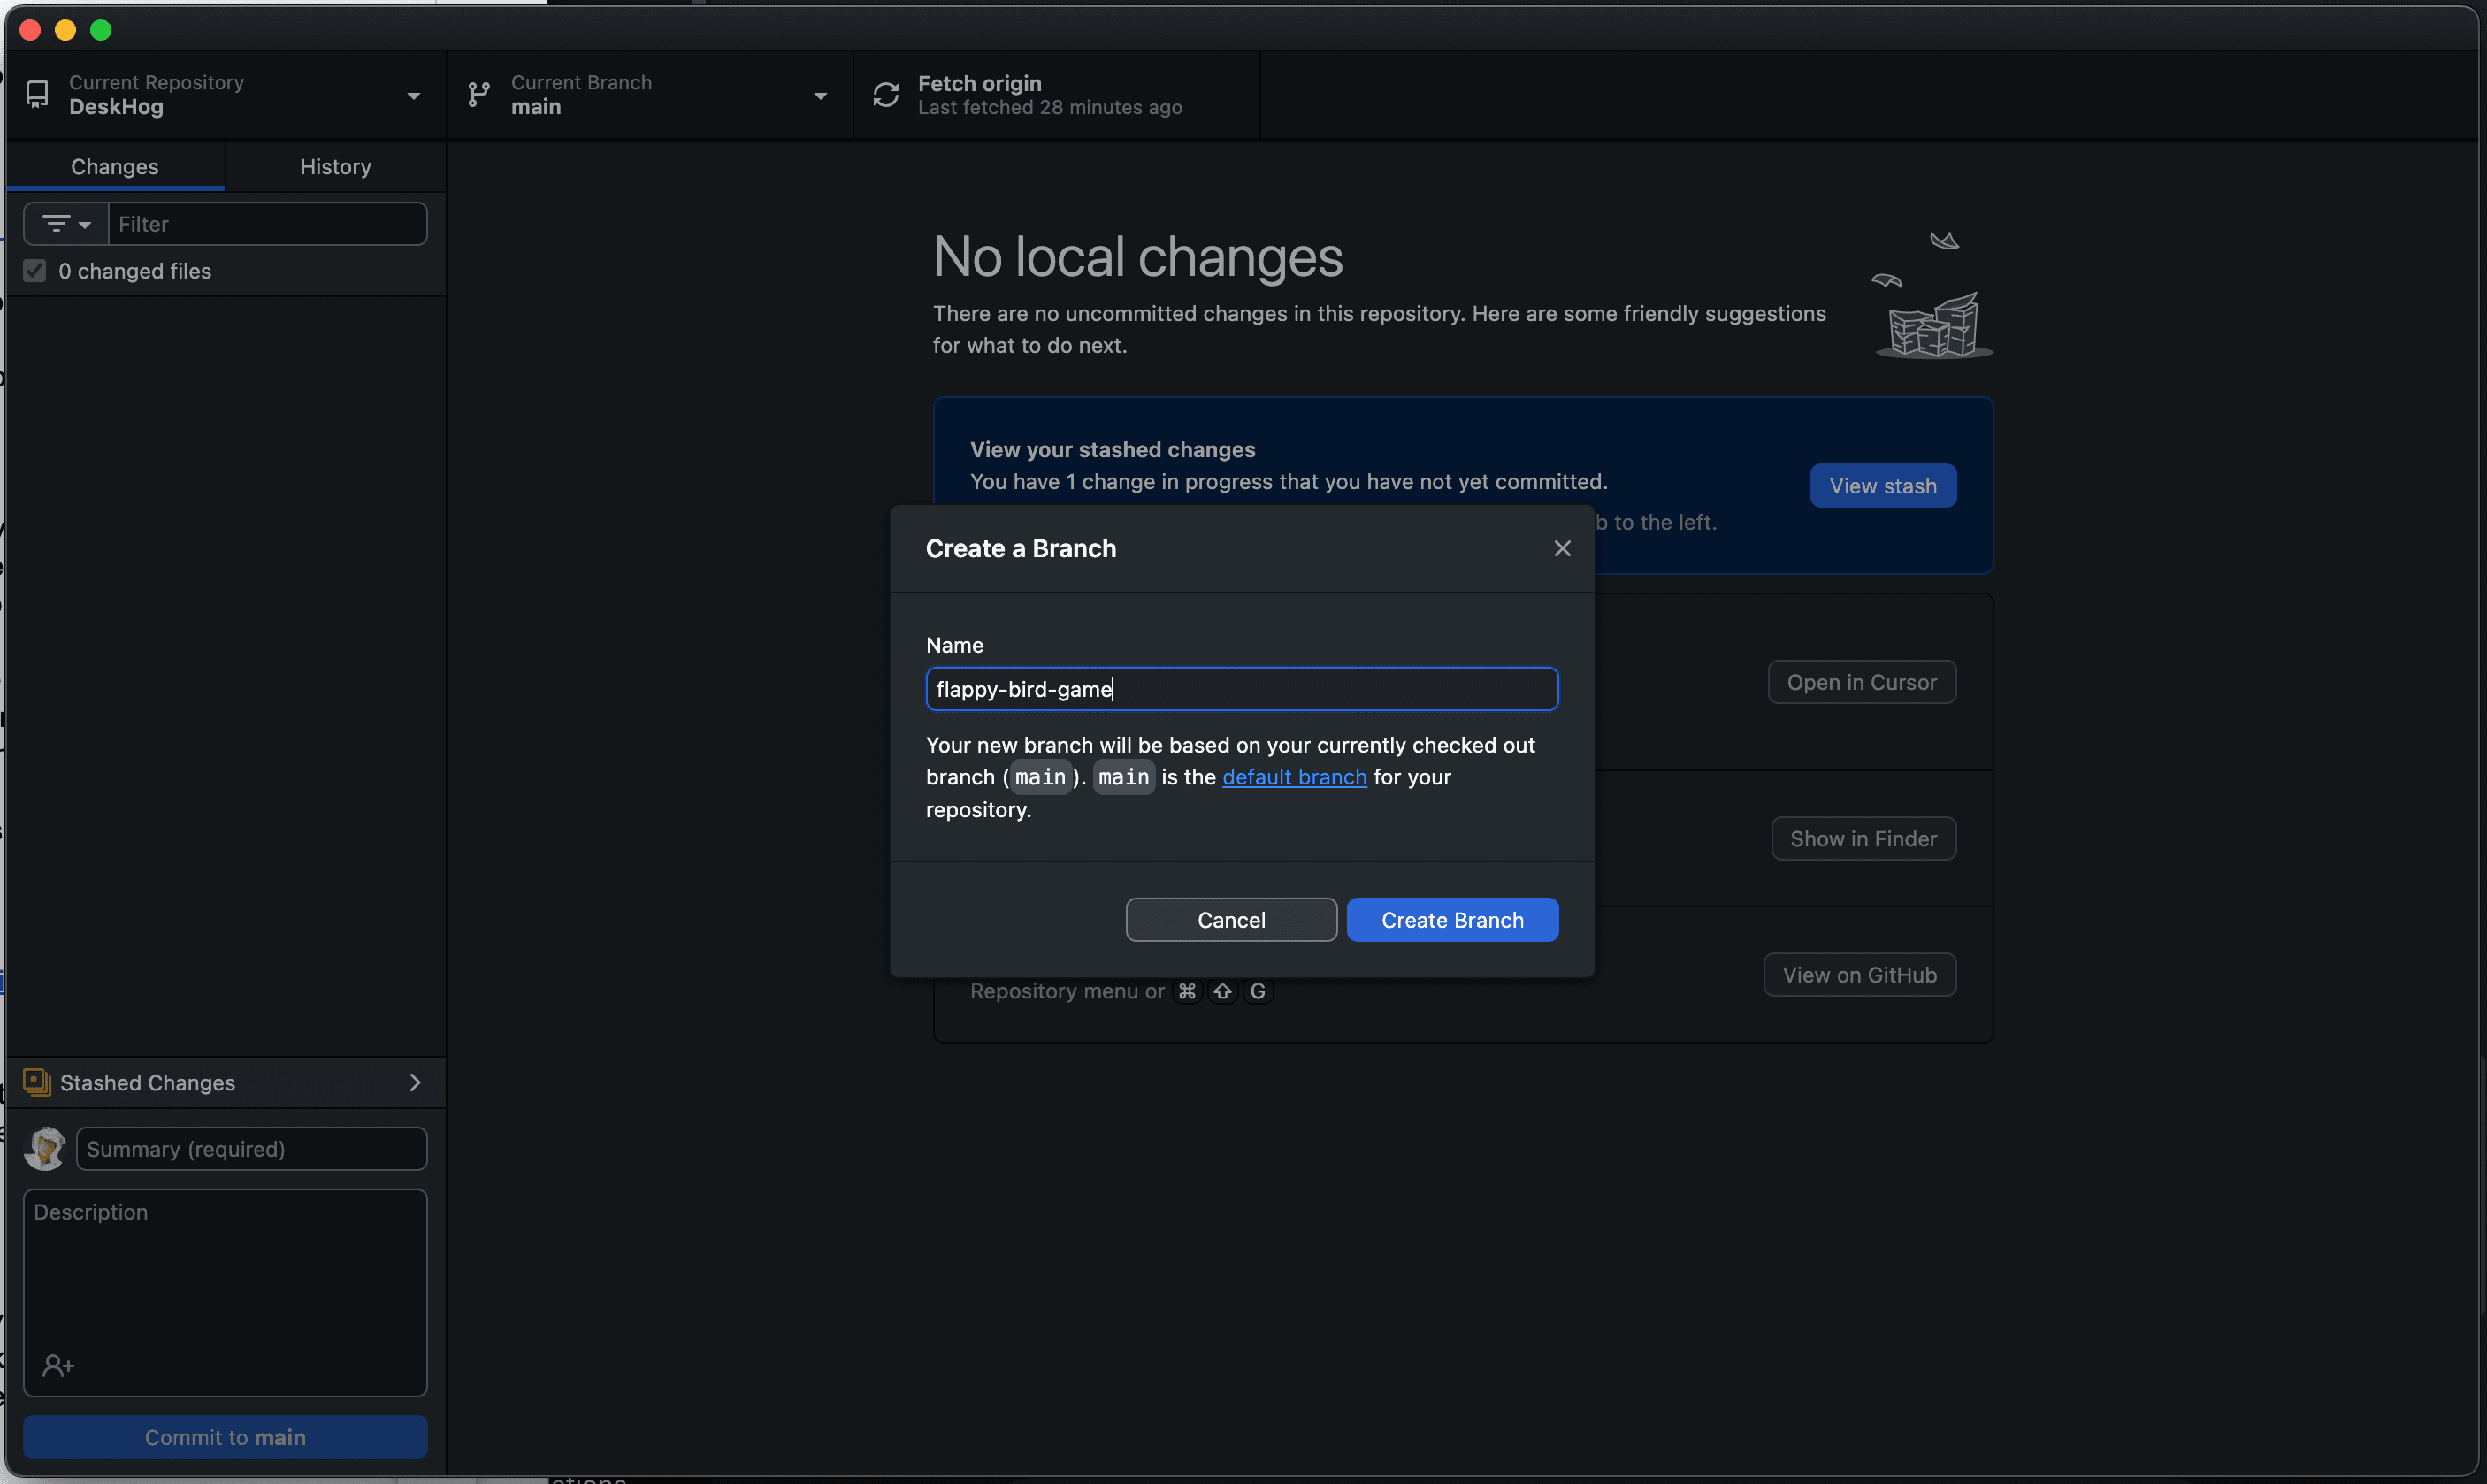
Now we’ve assembled our stack of tools, it’s time to put them to use. Start by going back to GitHub Desktop and creating a new branch. You can do this in the UI by clicking Current branch, then New branch. It helps to give your branch a descriptive name.
 Now, it’s time to edit the code. In GitHub Desktop, click Open in Cursor. Once Cursor starts, open the AI chat by pressing CMD + L and switch it to Agent mode if it isn’t already in it. This mode empowers the AI to modify the code on our behalf, which is exactly what we want.

Giving Cursor context
To help Cursor write better code, it’s useful to give it some background on how DeskHog works.
- In the AI chat window, click @ Add Context.
- Type
README.mdand select it — this tells Cursor about the project and how to use it.- Repeat for
Tech-details.md— this gives it the hardware specs.With both files added, Cursor will have a much better understanding of what it’s working with. As you get more familiar with Cursor, you can also point it at additional files so it has greater context.
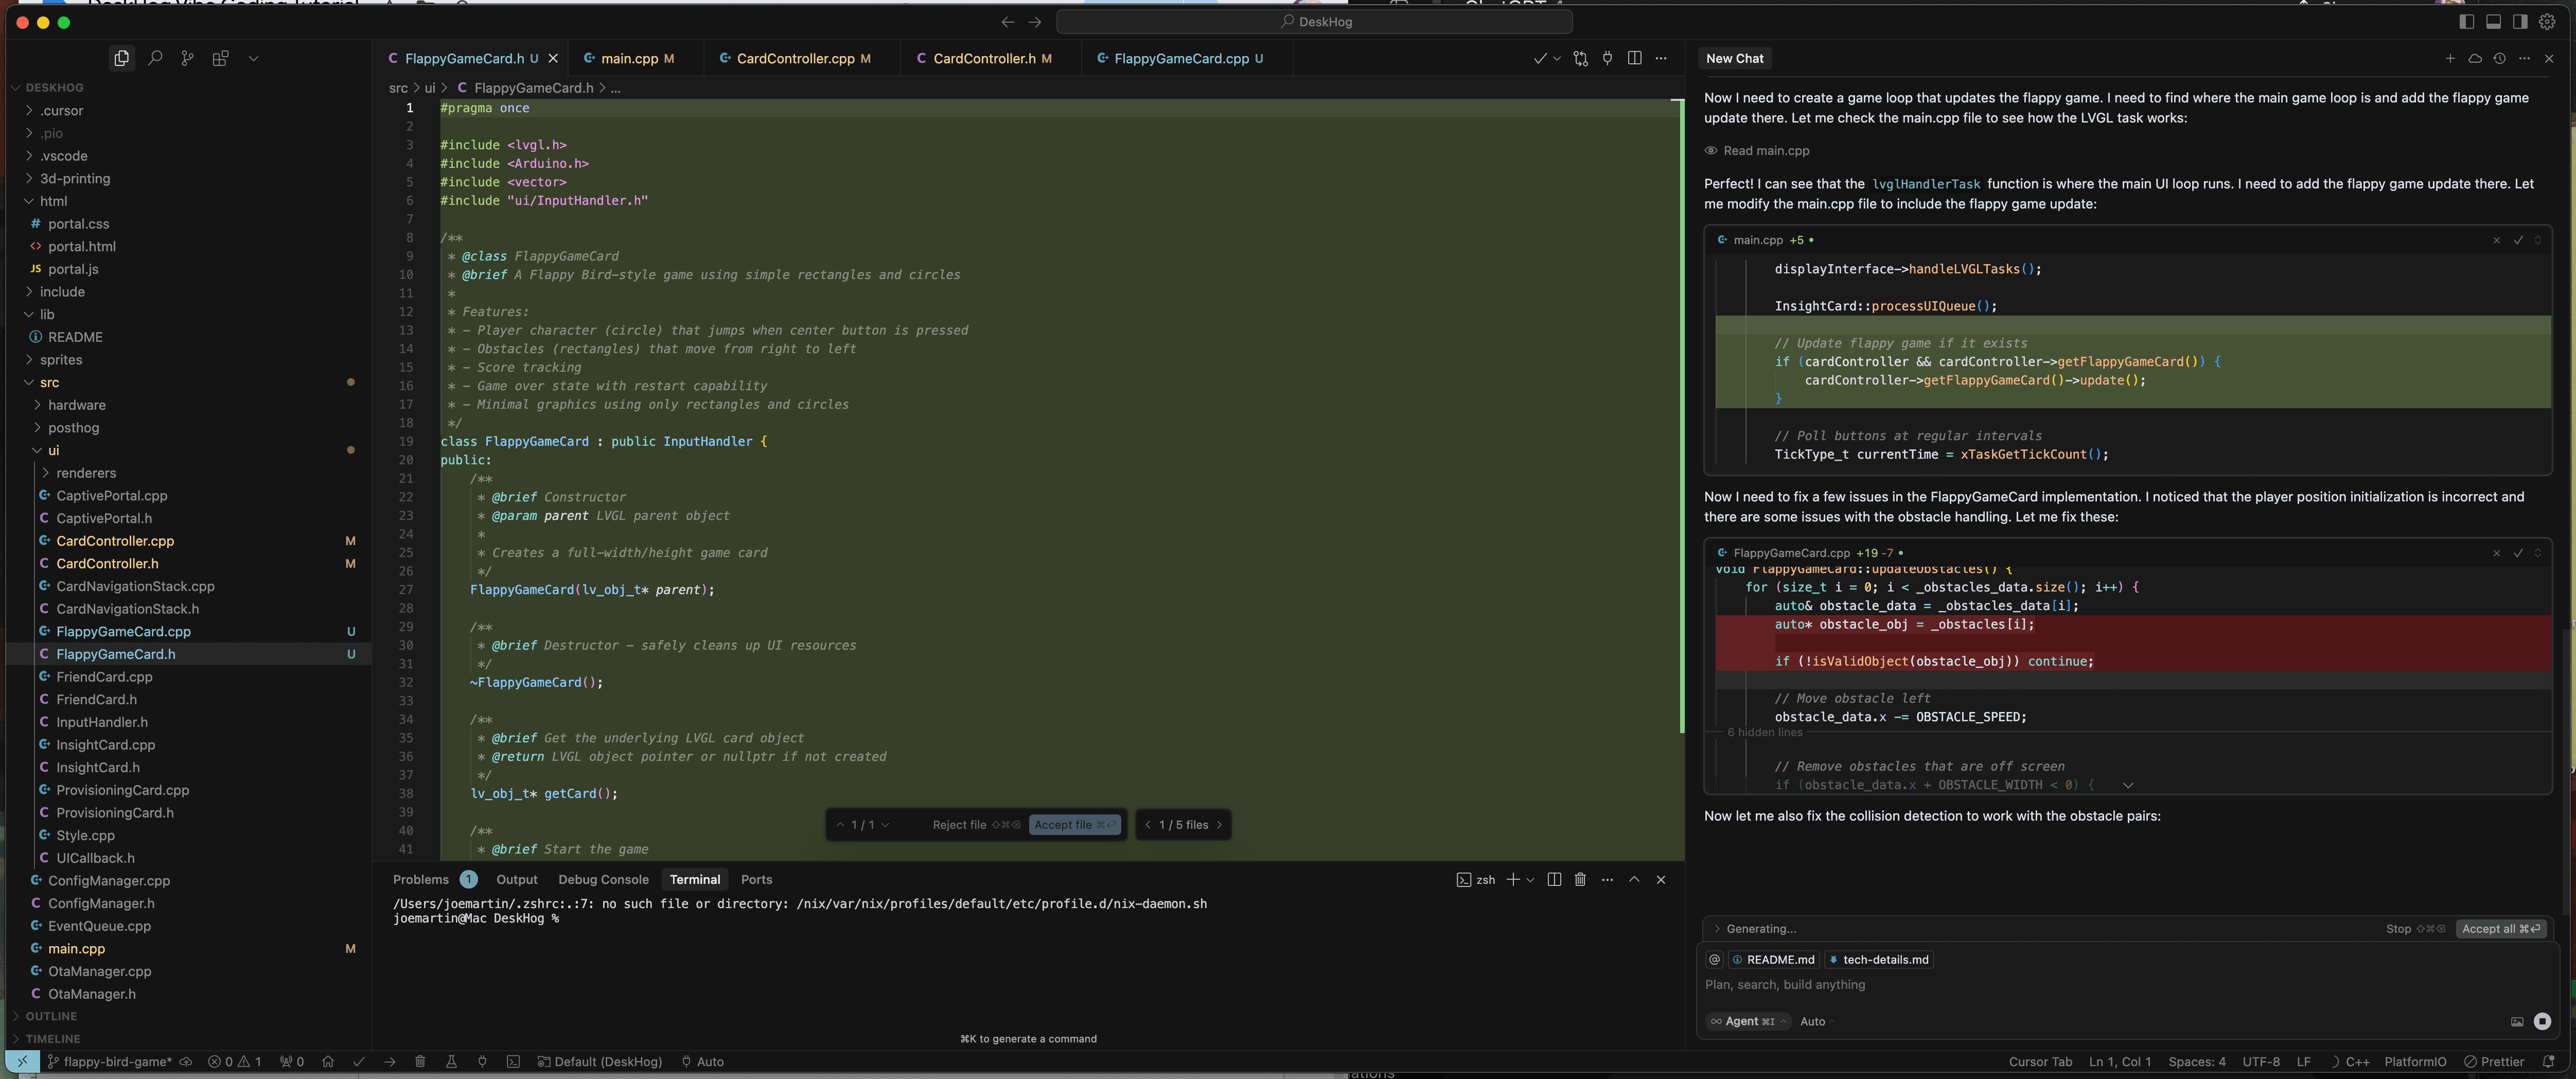
Now we’re ready to start vibe-coding! It helps to start simple and to give Cursor specific instructions, so give the AI this prompt to get it started:
Cursor will now start thinking (this can take a few minutes) and drafting the code for us. You can follow along with it to learn more about the process, check what it’s doing, and watch the vibes manifest. Once it’s done, press Accept all to accept the code it has written.
Next, we’ll use PlatformIO to build and deploy the code Cursor has created for us.
Deploying and testing your code
In order to do anything with this code, we’ll need to first build it in Cursor using the PlatformIO extension. We can do that by pressing the tick icon on the status bar at the bottom of the Cursor window.

PlatformIO will then start compiling the code into a format DeskHog can understand. Open your terminal (Terminal > New Terminal) if it isn’t already and you’ll see it’s progress, eventually culminating in a SUCCESS message.
Unsuccessful builds? Unfortunately, it happens. Vibe-coding isn’t perfect and it’s hard to predict what the AI will do sometimes. If you hit an issue here building or deploying your code then skip to the next section for tips.
Once the code is built, it needs to be deployed to the DeskHog. Just hit the arrow icon next to the tick to start deploying the code and putting the terminal to work again. Your DeskHog will need to be plugged into the computer for this to work!
If everything goes smoothly, your DeskHog will reboot and you can navigate to your new game and play it. But, when does everything ever go smoothly?
Iterating, bugfixing and committing
It’s very likely you’ll hit a bug or see some unexpected behaviour. Even if everything goes perfectly you’ll probably still want to make modifications, such as tweaking the game logic or graphics to make the game better.
Ultimately, this is the essence of vibe-coding: giving Cursor a prompt for the change you want to make, letting it modify the code, then building and deploying that code to test it on your device. This loop will get faster as you learn more about how DeskHog works and give Cursor more and more context.
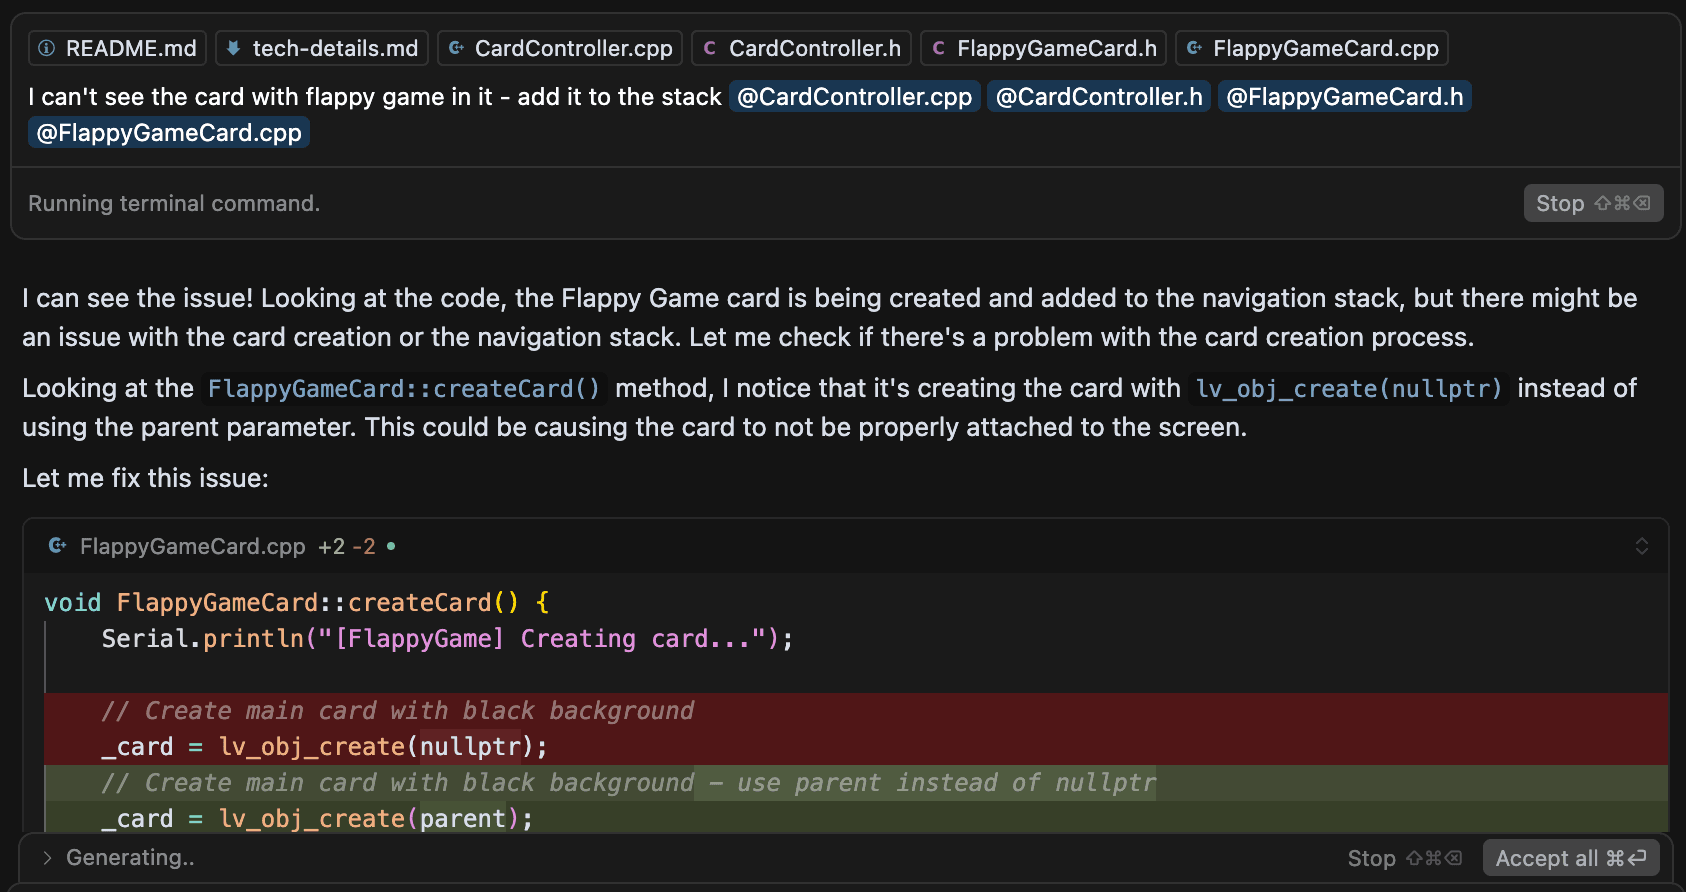
In our case, we hit an initial bug that we needed to solve. The issue was that the game we’d asked Cursor to make wasn’t immediately visible on DeskHog. Thankfully, fixing the issue was as simple as giving Cursor some additional context (in this case pointing it at the CardController.h and CardController.cpp files which control the UI) and explaining the issue.
With other, more complex projects you may also see unsuccessful builds from PlatformIO. You can usually solve these by copying the error text from the terminal into Cursor’s AI agent and asking it to fix the problem.
If you’re still at an impasse after several attempts then it can also help to ask Cursor to explain the error to you, or consult an additional AI tool for advice.
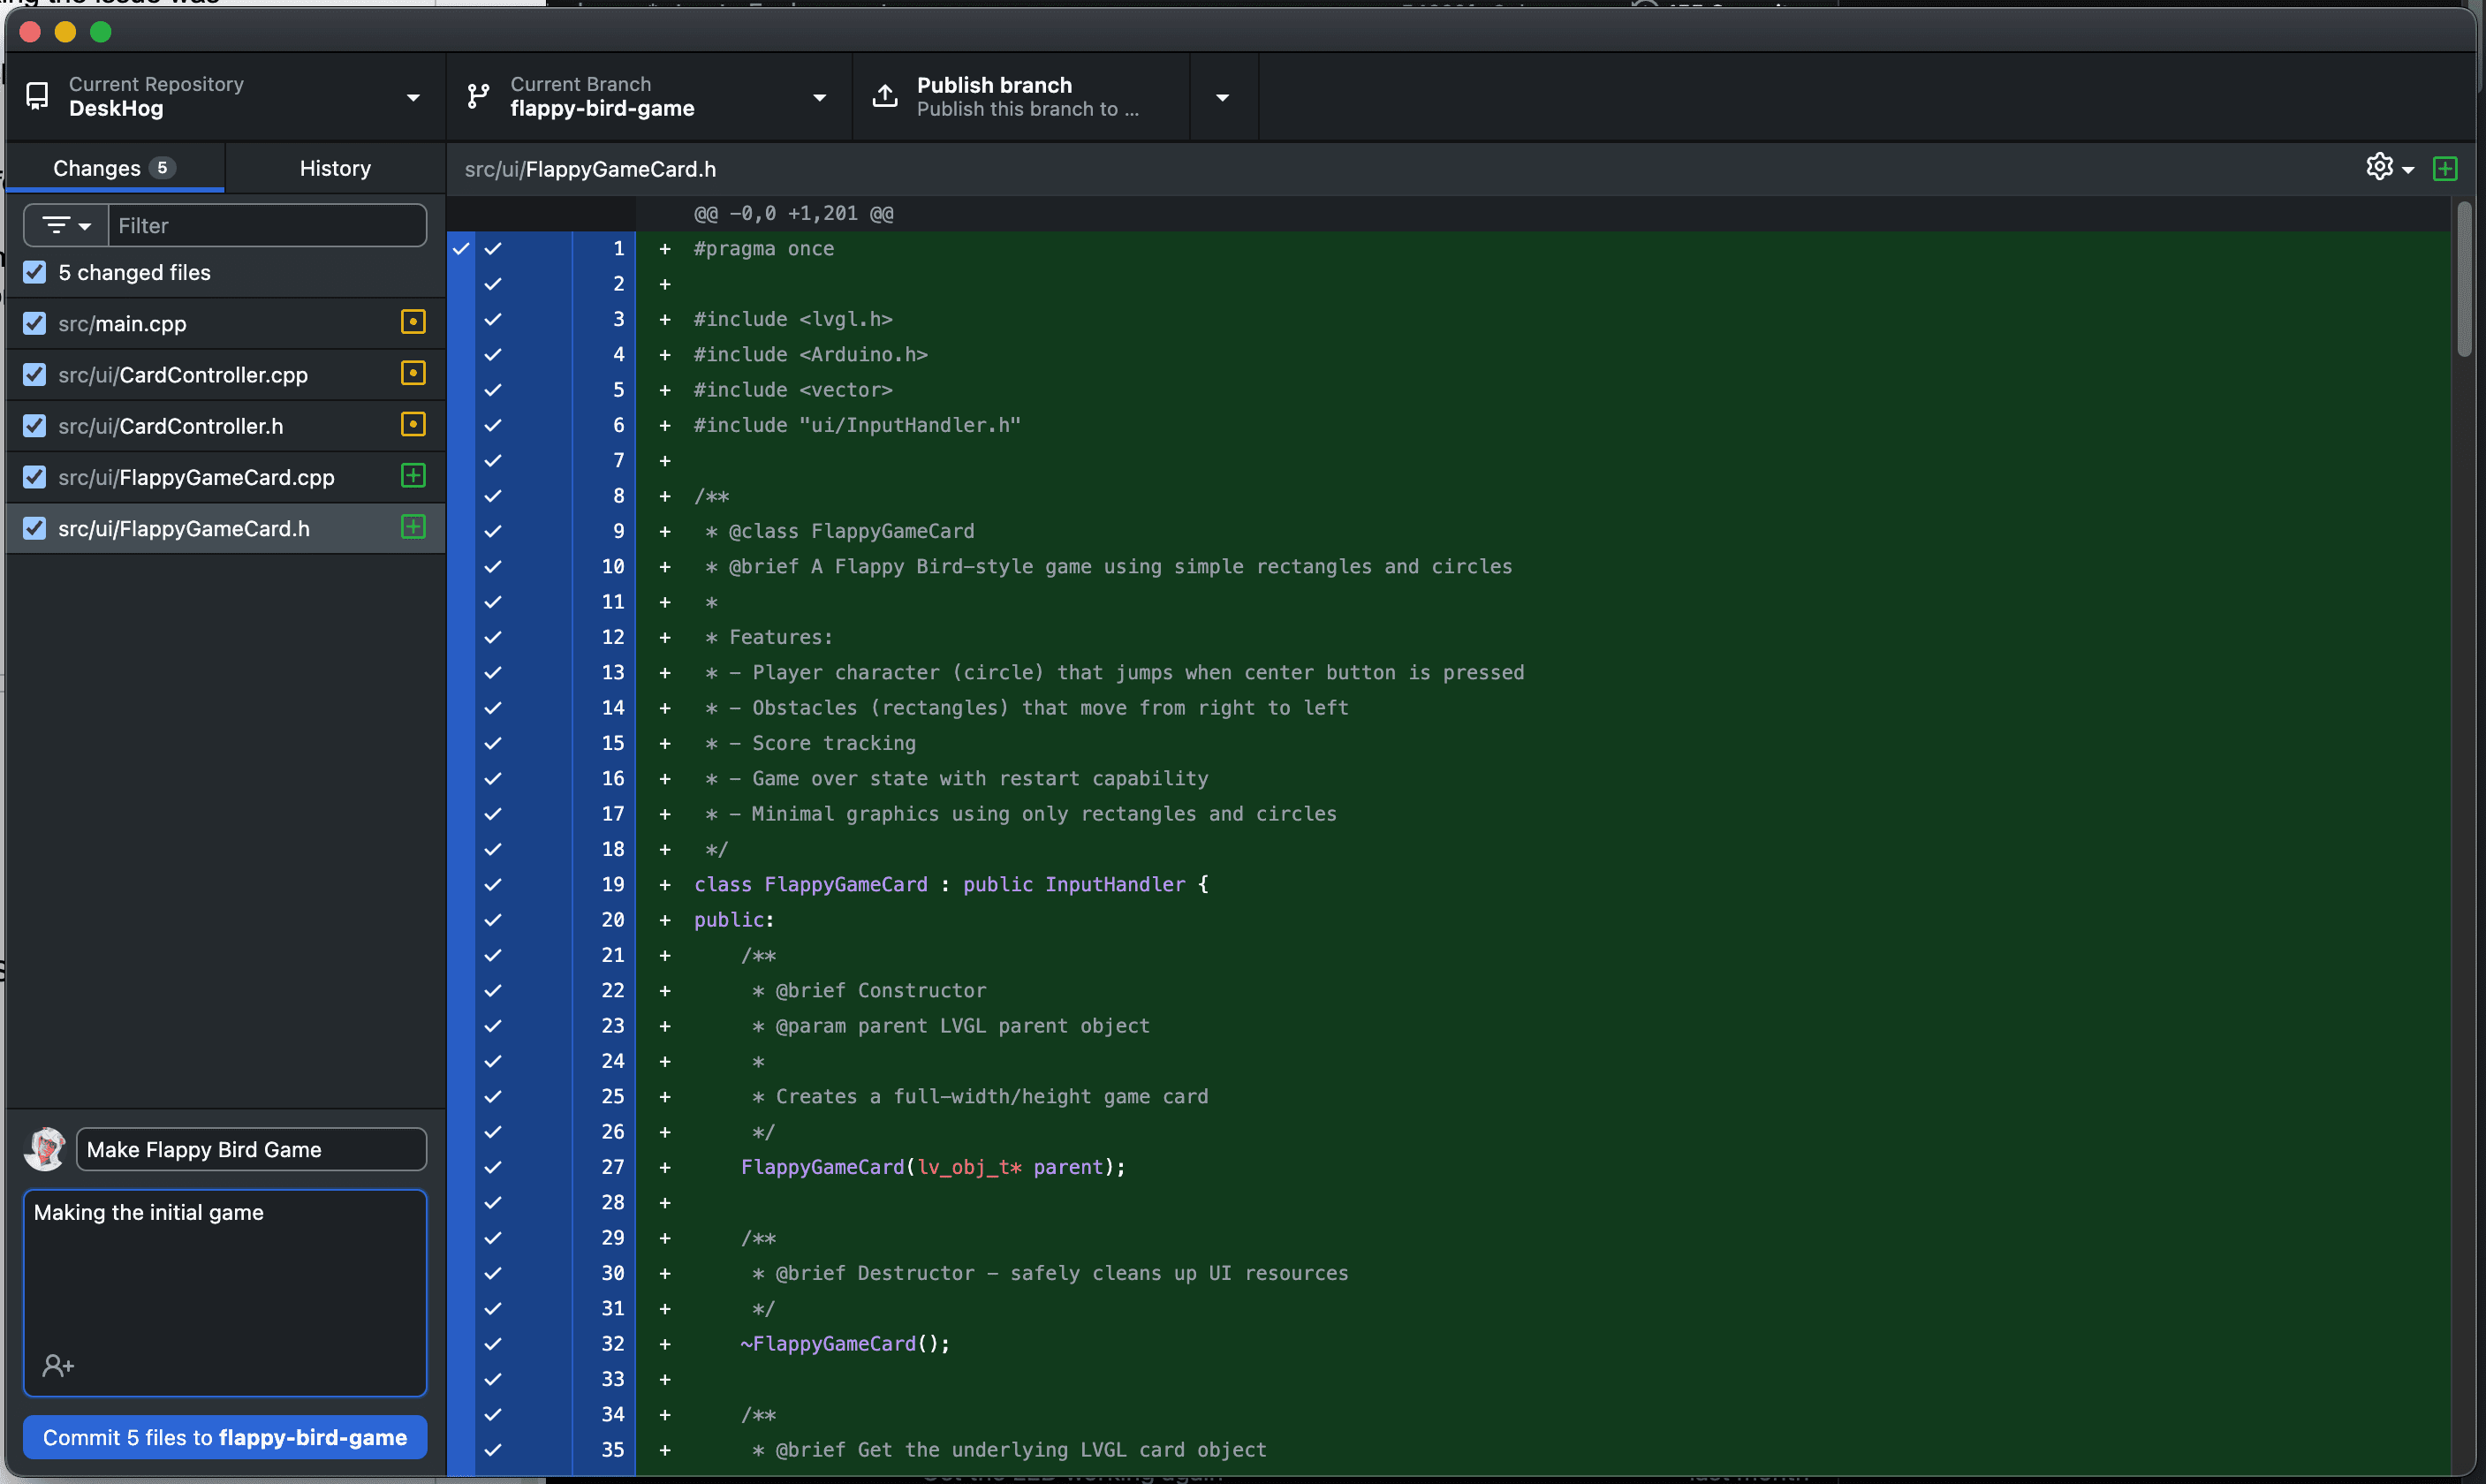
Eventually though, you’ll want to save your work — and it can be smart to do this when you hit significant milestones, such as getting the game to an initial workable state. Start by saving all your modified files in Cursor, then head back to GitHub Desktop, add a name and commit title, and hit the Commit button.
Committing like this doesn’t make your work public — it merely saves the state of your code. You can continue adding more commits to further develop your code and, when you’re ready, you can open a PR (pull request) to merge your changes back into the main codebase. This will let everyone else with a DeskHog interact with your game and add further changes.
To do this, first Publish your branch, then click Create Pull Request to open an empty PR in your browser. Give your PR a descriptive title and a description, then hit Create Pull Request in your browser to submit your game for consideration from the DeskHog community.
Congratulations, you can now add ‘Game developer’ to your LinkedIn profile!

Subscribe to our newsletter
Product for Engineers
Read by 60,000+ founders and builders
We'll share your email with Substack
Questions? Ask Max AI.
It's easier than reading through 669 pages of documentation